Monster Project

Plan:
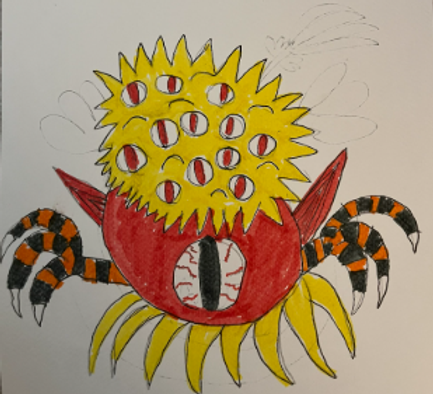
To make this monster, I will start with a round ball the size that I want the body of the monster to be. Once I have it the right size and have smoothed it into a perfect sphere, I will use a wire cutter to cut the sphere in half across the middle. Then, I will use a loop tool to hollow out each side of the body. I will use this method opposed to a double pinch pot method because it produces two halves that have the same thickness, and that fit together perfectly when scoring and slipping in order to make a perfect sphere. Once I have hollowed out each side, I will cut a hole in the bottom middle of one of the sides so that when fired, the piece has a place for air to escape. Then, I will score and slip both pieces together. Next, I will make the fingers/claws. To make these, I will first roll out the general shape of each of the six fingers. Then, I will create a small hole at the tip of each of the fingers. Next, I will shape each of the claws individually. Then, I will score and slip each claw into the finger, bending the claw and finger slightly downwards. I will let these claws all dry for 2 days before adding more detail to them so that they are less fragile/wet when I am trying to shape them. When I do shape them, I will use a small loop tool to cut lines out where the colors will change. Then, I will use water to smooth out these indents in order to make a claw that has segments. I will let the claws dry again for 2 days for the same reason as previously stated. Next, I will score and slip the claws together, in 2 sets of 3, with the middle claw angled a little higher than the side claws to add a more realistic look to it. After that, I will make the arms using the same method as the fingers and score and slip the arms and hands together. After that, I will make the ears. I will start by rolling out a small slab and tracing the general shape of the ears from a print-out of the monster drawing in order to accurately get the correct shape of the ears in the drawing. I will then cut out that shape and add to it some dimension. I will build it up along the edges and make the inside of the ear textured, and also curve the general ear shape inward a little bit. Then, I will make the top headpiece, starting by making a pinch pot to build the dome-like shape of this headpiece. I will then score and slip this onto the top of the monster (with the hole at the bottom), leaving a hole at the back of the headpiece so that I am not trapping air in the headpiece. Then, I will add spikes along the edge of the dome. Then, I will make dents for eyes all over the top of the headpiece. I will make some shallow (for closed eyes) and some a little deeper (for open eyes). Then, I will roll out balls of clay and press them into the eye dents, scoring and slipping then to keep them secure. Then, for the open eyes, I will create the eyelids so that they are open. For the closed eyes, I will create the eyelids in almost the same way, just press them together so that they look closed, but they still look like they have eyelids. once I am done adding the eyes to the headpiece, I might add smaller spikes throughout the top (in between the eyes) depending on how crowded the top already looks, but I will likely just leave it how it is. Once the headpiece is on, I will have a frame of reference for the rest of the monster, so I can make the big eye on the main body (using the same method as the other eye, but with a very shallow grove, a half-dome eye scored and slipped on, and no eyelids), and add the pieces that I have already made- the claws and the ears. Once all of that is done, I will move on to the bottom half. For this part, I will make separate spikes (Rounded out a little at the bottom so that they are not a hazard for a kid to play with and so that they do not scratch whatever surface the monster is put on) and score and slip them onto the bottom of the monster in a circle. I will make these spikes thick and short to provide the most support for the monster, as they will be holding the entire monster up. However, these spikes will originally be too soft to hold the whole monster up, especially with the monster being quite top heavy. So, I will lay the monster on its side while it dries, and not stand it up on its spiky 'feet' until it is bone dry. At the start of the drying process, I will wrap the monster in saran wrap so that it does not dry too fast and crack. I will let the monster dry until it is bone dry. Then, I will paint it with cone 05/06 underglaze, in the colors shown in the drawing on the left above. It will then be fired at lowfire temperatures. Once it has been fired once, I will glaze it with clear glaze and it will be fired again.
Reflection:
The construction methods I used were particularly effective in completing this piece. I was able to accurately capture the various design elements from the drawing effectively through a variety of processes. I think the method I used for the 'feet' worked well, as it captured a feel similar to the original drawing, but did allow for structural support for the rest of the monster. The thick and short shape of them effectively provided the heavy monster with a supportive base. I think that shaping of the ears and claws also went well when I was making this piece. Since the ears were a flat piece, I was able to trace the exact shape of them from a printed out picture of the drawing to get the exact shape as the drawing. I was then able to add more details and 3D elements to them, but the shape stayed very similar to the original drawing. If a reference is available, this is a useful method to use to capture the exact desired shape. The claw-building was also originally successful. The construction method I used allowed me to easily give the claws a curved and segmented shape at the same time. Problems I had regarding the claws were not as much due to the construction process as they were due to the fact that I painted the monster before bisque firing it. I also think the method of building the overall structure of the monster worked well. I used a double pinch pot, with a piece of a pinch pot attached at the top, which allowed me to easily get the distinct shapes of the middle and top pieces of the monster.
Although I am happy with the final result of this project, I did face multiple challenges in the process of making it. When still in the process of building it with clay, it was very difficult to avoid putting pressure on certain weaker parts of the monster. The legs in particular where a bit of a challenge. I knew that if I set the monster down on its 'legs' before it was fully bone dry, the legs would not be able to support the full weight of the monster. To avoid putting pressure on the 'legs' and breaking them off, I used a method involving rolled up hand towels to support it instead. I place one bunched up towel in the middle, balancing the monster on to of it so that the legs were not touching the table. I then placed three rolled-up towels around it to stabilize it and prevent it from falling to the side. This method was effective in taking the pressure off of the legs before they were bone dry, which prevented them from breaking. However, it also caused problems when the hand towels around the monster didn't provide it with enough stabilization and the monster fell over. This caused multiple pieces of the monster to break off several times.
The long process of making the monster also meant that there were stages of making it where it was hard to preserve all parts of it when storing. Specifically, the spikes on the top of the monster. There was one stage in which the spikes circled the edge of the monster, and I had to pack it into a box to transport it. This caused some of the spikes to get slightly squashed. Although they were not particularly difficult to fix, I would probably avoid transporting involved projects like this unless absolutely necessary in the future.
The major issues I faced in this project were due to the fact that I did not bisque fire my monster before underglazing it. If I had simply let the monster dry undisturbed until bone-dry, and then fired it right away, I likely would not have faced the challenged I did regarding the monster breaking. Because I attempted to underglaze the monster before firing it, it was fragile when I was painting and very susceptible to breakage. The piece broke multiple times over the course of me painting it because of an accidental knock to the arm of the monster while moving it around, or because the monster tipped over. This was a huge problem, as it meant I had to repair the arms, legs, and ears of the monster multiple times. Repairing it became particularly difficult after the monster became bone dry. From this experience, I have learned to bisque fire
Alebrije Project

Plan:
*Not started
Reflection:
*Not started
Poster Research and plan:
*Not started
Series of 4 Project

Plan:
*Not started
Reflection:
*Not started
Lidded Box Project

Plan:
For this project, I am going to start by shaping the general structure of the panda head out of clay, just as a solid block. This will allow me to get the exact shape that I want, and ensure that the top and bottom of the box will line up perfectly when I separate them. After shaping the clay, I will use a wire tool to cut the box in half so that it has a top and a bottom. Once I have these two pieces, I will use a loop tool to hollow each out, and use a wet sponge to gently smooth out the insides. Then, I will cut a groove along the inside of one piece and the outside of the other piece where they join together, so that the lid piece will join with the base piece. Once I have done all of that basic molding, I will cover both pieces in saran wrap (so that they do not stick together) and place them together so that they can dry slightly. Once the pieces are leather hard, I will take the bottom piece out of the saran wrap and score and slip onto it ears that I have shaped. Then, I will let them dry until they are bone dry, taking special care to make sure they dry slowly so that they do not crack. I will do this by loosely covering them with saran wrap, and letting any thinner parts be covered more so that they do not dry quicker than thicker parts, preventing them from breaking off. Then, I will underglaze the piece with while and black underglaze and fire it at lowfire temperature. Once it has been fired, I will coat it with clearglaze and then fire it again.
Reflection:
*Not started